Thursday, June 30, 2011

Hiding the Siding

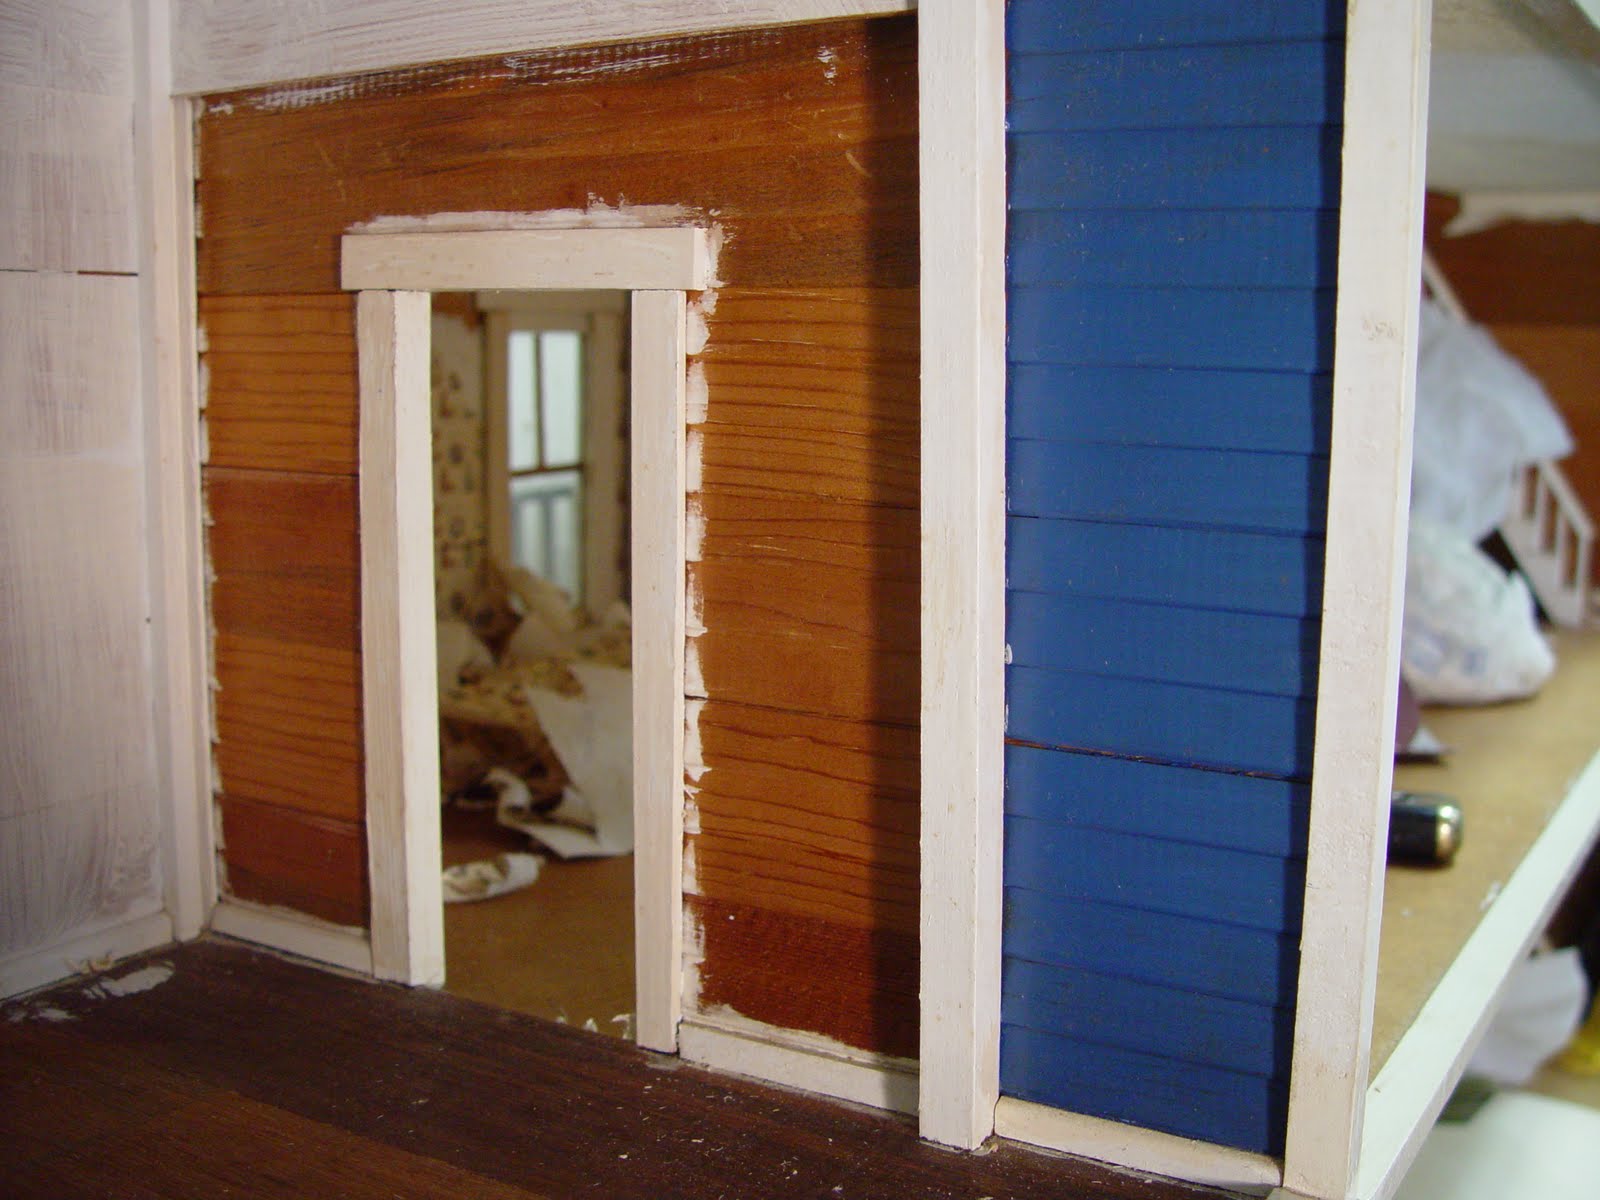
As mentioned in an earlier post, the Smiley house has two room additions, each of which ended up with exposed siding from the original house exterior.  In order to eliminate the look of an afterthought addition, we had to cover the siding with a wall panel that could then be finished to match the rest of the walls in each room. 


In both cases, the walls in question were also partition walls with doorways further complicating the installation of a faux wall or way to cover the lap siding.  We decided that the simplest method would be to glue in thin sheets of basswood around the door frames. 

The first step was to create a "template" from paper.  By cutting strips of paper and taping them together on each wall, we had a removable pattern that we could use to mark and cut the wood we would use to cover the siding.  Since each sheet of the basswood we used is 4" wide, we laid the pattern lengthwise across the wood and traced the more complicated portion (area surrounding the top of the door frame). 

We then cut the section from the wood and fit it in place on the wall.  With a little trimming and sanding (to account for slight imperfections and hard to reach spots), we got a perfect fit.  Since the lower portions of the walls were basically rectangular shapes, we just measured the width on each side of the door, compared it to our pattern, then cut and trimmed each piece of wood for a perfect fit.  In the end it took 6 pieces of wood horizontally installed on the first floor (kitchen) to cover the siding. 

Using a generous amount of silicone based glue and clamps, we installed the covering.  We checked back periodically to make certain that the wood was not curling or pulling away from the wall.  It is particularly important since we used a soft wood like basswood.  We discovered when doing a similar installation that a glue with a higher concentration of moisture tended to cause more curling (and warping) of the cover-up material. 
Once the glue was set and dried (about 24 hours), we sanded the joints to create a smooth seam where each piece abutted one another.  We then added a light layer of wood glue along each seam.  Finally, a coat of primer topped off the installation. 

The walls are now ready for trim paint, wiring, and wallpaper.

Tuesday, June 28, 2011

Now a Blank Slate

The interior of the Smiley house is now a blank slate. All old wallpaper has been removed and a coat of primer applied to just about every inch of space. The exposed siding in the room additions (laundry room and kitchen) has been covered with sheets of smooth wood, which has also been primed.

I am now applying a coat of off white paint to all the interior trim, including the windows, baseboards, and framing. I am debating about how I will apply the wallpaper in each room. The overall design of this particular dollhouse results in wood trims around all edges and corners of walls in an attempt to mask seams and serve as a means of stability for the thin woods. I suspect I will install "panels" of wallpaper on the walls within the trims framing each one. Typically, I install wallpaper on each wall with seams tucked into the corners of the room. However, several rooms have walls that are not solidly connected to adjacent walls. If I were to use my normal method of installation, I anticipate the wallpaper would eventually tear in the corners due to this design. In any event, I will demonstrate the process I use for hanging the wallpaper.

However, before I begin installing wallpaper, I will plan the electrical wiring layout using the tapewire system. This particular dollhouse is predisposed to numerous issues that will impact the way I choose to lay out the tapewire. A couple of those issues include the gaps between several walls, the presence of the wood trims around most wall edges, and most importantly, the thin wood used in its construction.

Have I mentioned that I do enjoy a good challenge?

Friday, June 24, 2011

The Smiley is Actually...

For the record, I should mention that although I am referring to this house as "The Smiley" it is actually a Dura-Craft (VH600) Victorian dollhouse. (Thanks for the info Lori!) The Dura-Craft dollhouses are no longer in production, and while you can still find some of the kits around be careful because if any parts are missing you will need to manufacture them. Fortunately, with the exception of the front porch steps and handrail, this house is complete and intact. The other issue with the Dura-Craft dollhouse kits is that the manufacturer used thin, low quality woods that tend to make wiring and finishing more challenging than some of the other kits available on the market today. Contact your local dollhouse and miniature shop for suggestions when selecting the perfect new dollhouse kit or preassembled dollhouse for you and/or your family.

Smiley House Sans Stairs


I debated about removing the staircases, but not very long. Painting, wallpapering, flooring around staircases can be very difficult. The first couple tugs suggested that I might not want to remove the staircases as they felt like they would be nearly impossible to remove without destroying something.

I decided to give my metal putty knife a try to see if I could get it under the base of the first floor staircase. Success! With a little wiggling and pushing, the bottom of the staircase came loose. Next I slid the knife along the wall up the stairs to see if there were any obstacles.
By that I mean "glue." Fortunately, the glue that remained was fairly brittle and put up little resistance. The top of the staircase was a little more of a challenge.
Again, cautiously pressing between the floor and top step eventually separated them. I was able to remove both sets of stairs and the railings along the top without any damage.

It is important to note that occasionally the glue might be more resilient and require more coaxing. In that case, I recommend you get your hairdryer and apply a little heat. Direct the heat toward the glued area, making sure that the metal putty knife gets some of that heat as well. Then just continue to press and move the putty knife between the connected areas until they come apart. Don't force! Just slowly and patiently work the putty knife along the area.

Now it will be much easier to prime and wallpaper the walls along the staircases. The idea of cutting the wallpaper to fit against each stair was not something I wanted to do. It is much easier to wallpaper an entire wall rather than fit around steps.

Thursday, June 23, 2011

Smiley House is Coming Along!


Ok, I just can't wait until the entire house is cleaned and primed. It never ceases to amaze me how a little cleaning and priming can transform a tired old dollhouse. I still have a long way to go, but I just had to share the difference already. A couple rooms still require wallpaper removal, but I've applied a coat of primer to those walls (and ceilings) that were ready. The old wood and a couple water stains are still showing through in a few spots, so I'm sure I'll apply another coat in those areas. I certainly don't want the discoloration showing through the beautiful new wallpaper that is going to be installed!

This is one of those times when I want to tell everyone that has an old dollhouse sitting in the attic or basement (or heaven forbid, garage). Take it out, breath new life into it! Give it to your grandchild, neighbor's kid, niece or nephew, donate it to your church or community auction. Someone, somewhere, somehow spent hours (and I'll bet highly enjoyable time) building and decorating that dollhouse once upon a time. Don't let it sit alone in a corner to deteriorate. Share the joy it will bring! Building, remodeling, giving is so rewarding!

I digress...

back to the Smiley renovation!

Laundry Room in the Smiley House

Today I tackled the laundry room. As I previously mentioned, when the house was constructed this room addition was built without a smooth partition wall to cover the exterior wall siding. Although we are not completely renovating this house to the point where we would remove and replace door frames and trim, I still wanted to cover the siding before hanging wallpaper in this room. Basically, I cut and fit pieces of wood over the siding. The wood was then glued (generously) to the siding. Next I'll fill in any of the gaps with wood fill and sand smooth.

I think I'm going to have to consider how I'm going to hang the wallpaper in this room because of the "header" that exists over the door way. I'm thinking I might drop the border trim a little lower and align it with the bottom of the header. I'll decide when I begin wallpapering the room.


I will need to repeat this process in the kitchen as well. I'll post pictures of how I created a template for cutting the wood to fit around the doorframe.

Monday, June 20, 2011

Smiley Nursery Prep Work

Well, I finished stripping the wallpaper from the nursery. Generally, when I'm remodeling a dollhouse, if the wallpaper appears solid and intact (i.e., no tears, bubbles or ripples), I might opt to leave the wallpaper in place and paint over it with primer. As I looked closely at this room, I noticed several areas where the paper had torn and was peeling away from the walls.


When I slid the putty knife under the loosened spaces the paper came away fairly easily, which would suggest that the moisture from the primer would probably cause the paper to bubble and peal away. I scored the wallpaper using the corner of the putty knife, lightly sprayed the walls with window cleaner (double purpose here), waited a couple minutes and then began pulling the wallpaper off the walls. As an aside, I personally like to apply at least a coat of primer to the walls before applying wallpaper. Much like painting drywall in a real life house before hanging wallpaper. Have you ever tried to remove wallpaper from unpainted drywall? Yuck! What a chore. Primer and/or a coat of white paint really does do triple duty: seals the wood, provides a good base for wallpaper application (both from the standpoint of adhesion and removal), and protects the purity of the wallpaper color. Imagine the darkness of wood showing through a thin white wallpaper.


About a half hour later the walls were stripped and a puddle of paper shreds lay on the floor. Reminds me of removing the wallpaper from our real life house, but it took more like a day to complete the removal project there! Next I'll sand down any of the remaining paper and wallpaper paste then apply a coat of primer.

As I was "sweeping" up the remnants of the wallpaper, our UPS delivery guy arrived. He looked quizzically at me and asked what I was doing. I told him I was remodeling the dollhouse. He left shaking his head and muttering "remodeling a dollhouse..." Some folks just don't get it!

On to the next room!

Saturday, June 18, 2011

Smiley House 3rd Floor "Before" Pictures

The homeowners plan to use the third floor in the Smiley house as a nursery, game/music room, and a sewing room.

I think there is still some debate there, but they have already chosen the wallpapers.

I found that we do have one pattern too many, so we'll need to address some potential changes in the plan or wallpapers.

The same steps outlined for the 2nd floor (see previous post) will be taken on the third floor remodeling process.

Lots of cleaning and painting first! (But should I leave the little tiny handprinted "Becky" I found on the third floor?) Looks like someone was excited about getting the dollhouse and was making sure everyone knew she was the lucky owner to be!

Smiley House 2nd Floor "Before" Pictures

The first step in the remodeling process will include a thorough cleaning, priming, and trim coat. That will be followed by electrification. Wallpaper and flooring will be installed in the final step.

The laundry room, shown at the left will require an extra step or two since the siding is showing on the interior wall. I suspect we'll create a faux wall to cover it before applying the wallpaper.

The second floor has four rooms, which the homeowners decided to use as laundry room, bedroom, bathroom, and master bedroom.


The bathroom is essentially a blank slate, which will receive a coat of primer then a lovely blue pattern paper and tile floor.


Currently an unfinished fiberboard material, the floors will be covered with red oak hardwood flooring sheets.

Smiley House 1st Floor "Before" Pictures

The first floor includes the kitchen, dining room, and living room. Carol, Becky and Becky's mom, Lynne, spent some time selecting wallpapers and hardwood flooring for each room.


We will paint all the trim in the house in an off white trying to stay in line with the original colors of the house, yet freshen it up. The ladies have chosen all of the wallpapers, which I think will look lovely in the house. You'll see the finished rooms upon completion. But for now, here's a peek at the first floor "before."

While studying the rooms a little more closely, I realized that the staircase really should be painted.  I considered a paint and stain combination, but the position of the spindles and the previously painted areas make that a little too complicated.  Painting the entire staircase will simplify the finish work.  A stair runner could be installed if the owners would like to dress them up a bit.  We are trying to keep costs down for the homeowners.

Smiley House Exterior "Before Pictures"

I figured I'd start out with a couple pictures of the entire Smiley house before beginning our renovation. Other than cleaning and some touching up, we are not really going to do much to the exterior, but it is a great house and in good solid shape. I spoke with Carol, the owner, briefly yesterday for a few details about its history. She recalled that it was built from a kit about 25-30 years ago, but could not remember the manufacturer. She began interior finishing, but was unable to complete the work. It remained in its unfinished state for the past 20+ years, but she is giving the completed and refurbished dollhouse to her granddaughter Becky.

Friday, June 17, 2011

The Smiley

First up is the Smiley house, so named for the owner who is handing it down to her granddaughter. I'm hoping to collect some history on this dollhouse for a little more background information. Stay tuned.

Introduction to Dollhouse Renovations

Welcome to our new blog...Dollhouse Renovations. It is our hope that through this blog, we will keep you posted on the ins and outs of dollhouse renovation. Maybe you (and I) will learn a few tricks to remodeling along the way through discussions and interactions to my progress. I'll share with you the trials, tribulations, challenges and successes that I encounter from start to finish.

While I have done many renovations over the years, this is the first time that I've decided to document the process. I usually forget to take before pictures, making it difficult to remember where I started. It is so very important to note that each and every house that I have done has presented its own list of obsticles and discoveries. Since no two dollhouses are exactly alike, each has been a learning experience. They have all given me some form of satisfaction upon completion. Whether it was my personal opinion of the completed project, the apparent delight in the eyes of the owner or recipient, or just the fact that I completed the task, I have enjoyed every journey.

I hope you'll join my journey and maybe even add a comment or two!